Sites to download cracked mobile applications, games, themes and ringtones for free – Part 2

|

The first part of this article, which featured some of the best sites for full mobile appz, games and themes, was published about a month back.

This post is an extension to the previous article and features several more sites from which you can download cracked applications for mobile phones, games, themes and ringtones for free. Supported mobile devices (phones, PDAs, iPOD, etc) range from Nokia, Sony Ericsson, Motorola, Windows Mobile, Siemens, LG, Samsung and many others.

Note that some of these sites may require you to login before you download anything. Registration for all these sites is free and currently open for all users. We have included the registration URL below each site for your convenience.

1. GSM Hacks
At a glance, GSM Hacks will look like your average mobile reviews and news site. Actually it’s much more than that; GSM Hacks Forums is where all the fun is. Their “Mobile Applications” section in General Discussion forums is home to many cracked (and non cracked) Symbian OS 9.1 Applications, Symbian Series 60/80/90 Applications, Pocket PC & Windows Smartphone Applications and Sony Ericsson Applications. Finding a particular item by browsing all the threads is not easy at GSM Hacks so it would be wise to use the search feature.

Site Name: GSM Hacks
Registration URL: http://www.gsmhacks.com/forums/register.php

2. Noeman GSM
Noeman GSM, which is part of the Noeman Network, is a huge online community with nearly 370000 members. Check under ‘Mobile Software Solutions’ and ‘Mobile Multimedia’ sections in their forums and you will find a lot of full applications, games and themes for S60, UIQ, S80, S90, Pocket PC, Smartphone, java based mobile devices. Some of the cracked applications are scene releases.

Site Name: Noeman GSM
Registration URL: http://www.noeman.org/gsm/register.php

3. Mobiles Mania

Mobiles Mania is a huge community of mobile users with 313000+ members. You can download a lot of cracked applications and full games for Symbian OS-9.1/9.2/9.3, Symbian 60 Series, Nokia 40 Series, Nokia N-Gage, Nokia 30 Series, Symbian 80 and Sony Ericsson/UIQ. Apart from usual apps and games, Mobiles Mania has a lot of software packs and even mobile optimized movies. It’s definitely a site worth checking out.

Site Name: Mobiles Mania
Registration URL: http://www.mobilesmania.com/forum/index.php?act=Reg&CODE=00

4. NokiaApps

5. Other sites

There are several other places where you can get your hands on cracked mobile appz, games, themes and the likes. You may want to check out http://symbianapplication.blogspot.com/ which has over 1500 posts all featuring S60V3 appz including scene releases. It updates several times a day and the links are pretty reliable.

6. BitTorrent trackers specializing in mobile content

If you are a fan of the BitTorrent protocol, there are a lot torrent trackers dedicated to mobile stuff you might want to check out. Here is a brief list of them; click on a link for more information on the site.

Credits: TEAM FILEnetworks

Sites to download full Mobile applications, Games Themes and Ringtones for free – Part 1

|

Who doesn’t own a mobile these days? We hope that this post will help you jazz up your mobile device with applications, games, themes, ringtones and more. The following is a list of some of the best sites available for mobile downloads. Most of them full mobile applications and games including scene releases, fan made themes, ring tone packs and many more goodies for your Nokia, Sony Ericsson, Motorola, Windows Mobile, Siemens, LG, Samsung or any other mobile device.

Note that these are not the only sites of this kind but these are the ones we have used and hones we have found to be reliable and secure. There can be hundreds more mobile download sites on the internet so if you know any feel free to share it will all of us by dropping a comment.

1. DotSIS


DotSIS is a huge online community that is dedicated to SymbianOS downloads and discussions. You can find full, cracked mobile applications, themes and games for the Symbian platform. Supported SymbianOS versions include SymbianOS 7/8/9.1/9.2 and 9.3 (S60, S60v2, S60v3, S60v3 FP1/FP2 etc). DotSIS also has separate sections for S40, S80, S90 and Java downloads as well. As said before it is a huge community with more than 630000 members.

You need to register to view some threads and to view the download links. registrations are currently open and is free.

2. iPMart Forum


iPmart Forum is another huge community that has mobile appz, games, themes as well as PC appz and game consoles. Their mobile section includes content for iPhone, Alcatel, LG, Mitsubishi, Motorola, NEC, Panasonic, Philips, Sagem, Samsung, Sharp, Siemens, Sony & SonyEricsson, PocketPC/PALM/SP and many more. With nearly 1 million registered members (currently 920,000), iPmart forum is one of the largest mobile communities in the world.

You need to register to view some threads and to view the download links. registrations are currently open and is free.

3. MobileCastle


Another excellent mobile community. If you visit the homepage, it may seem like yet another mobile news site. But that’s not where the fun is. Check the forums. It’s a place where more than 150000 members share their knowledge, discuss and download appz/games/themes for a number of different mobile phones and platforms. The following are the main categories in this forum:

* Smartphone / Windows Mobile / POCKET PC
* Nokia S80 and S90
* Nokia S60: 6600 - 7610 - 3650 - 6620 - 6630 -6680 - N70 - N80 – N90…
* Iphone Zone
* SONY ERICSON & UIQ MOBILES -K700 / K750 / T610/ J300 /K300 /K500 / K700 /W800/ W550 / p800 / p900 /p910 ...
* Nokia s40 : 7210 / 7250 / 3100 / 6610 ....

It’s needless to mention that most of the appz available on this (and other two sites mentioned above) are cracked versions most of the time. There is a good number of scene releases by groups such as BiNPDA, NokiaPDA, hsPDA and ILLUSiON on this forum.

You need to register to view some threads and to view the download links. registrations are currently open and is free.

Stay tuned for more similar sites which will be featured in the next part of this article (upcoming).

Credits: TEAM FILEnetworks

Convert MKV to MP4 for Xbox 360 (Easiest Method)

|


This article shows how to easily convert MKV files to MP4 files fully ready for Xbox 360 playback with as little re-encoding as possible to preserve quality. GotSent will automate a process that usually involves using several applications to extract streams from MKV files, change h264 stream characteristics, encode to AAC audio, mux as MP4 etc. Basically put, this is the easiest method and it works the vast majority of the time.


Introduction & Requirements

GOTSentObviously you will need to download and install GOTSent Fall 2007 Media UpdateIn the Fall of 2007, Microsoft released a media update for the Xbox 360 console to improve multimedia support. If you did not get this update yet, but you do have Xbox Live, then before this guide is over you will most likely have updated your Media capabilities. This update is Optional but highly recommended.Nero AAC Encoders (Optional)These are optional but recommended. You extract the encoder into the GotSent folder and it produces higher AAC audio quality. Haali Media Splitter Haali Media Splitter must be installed.AC3FilterAC3Filter is used during the process.WinRARYou need WinRAR to extract files from some of these downloads.

Xbox 360 MP4 Support
The Xbox 360 supports the MP4 container and several video and audio streams inside. The most important support is for H.264/AVC which is what most MKV files today contain. It supports AAC audio but not multi-channel. It does support XviD and DivX video inside the MP4 container also. Because MKV files often have AVC or XviD video streams, re-encoding is not always needed and so the process of converting MKV to MP4 can actually be very fast when armed with a tool like GOTSent.

Recommended: What will Xbox 360 play?

Download and open GOTSent archive

The first thing you need to do is open the GOTSent RAR file in WinRAR. If you have never used WinRAR before just install it and then .RAR files will automatically be associated with it. You will see that inside the archive is a bunch of files and folders.

What you must do now is go somewhere, anywhere on your HDD and create a folder called GOTSent.

Extract GOTSent files to Folder

Now using WinRAR, drag and drop the files and folders (CTRL + A to select all) into the GOTSent folder you just created so that it looks similar to the photo supplied with this text. Remember where you have put this folder for later use. It is good to keep all tools of this sort in the same directories so that you can easily find them when needed.

Download and open Nero AAC Encoders archive (optional)

Now download the Nero AAC files if you want to have the highest possible quality audio output. It is hugely unlikely that the MKV file that you input will have AAC audio (Stereo AAC LC at that) in it therefore GOTSent has no choice but to re-encode. The ZIP file that you download from Nero's site will open in WinRAR, and it has four files in it, neroAacTag.exe, neroAacEnc_SSE.exe, neroAacEnc.exe and neroAacDec.exe.

The neroAacEnc_SEE.exe file is specifically for computers that have processors that support SEE2. If your Intel or AMD64 chip does support SEE2, then that's the file we are looking for. If not (or if unsure), then neroAacEnc.exe is what we are looking for.

Extract Nero AAC Encoder into GOTSent Folder

Using WinRAR again, drag and drop the encoder files from the ZIP archive into the same folder that you put your GOTSent files.

Launch GOTSent application

Launch GOTSent for the first time, it is GOTSent_023.exe (version number may be changed by time you read this). It is an easy program to understand; had two input fields, one for input MKV, one for output folder (for MP4 file), allows you to select audio if there is multiple and several other options.

Load MKV file and Change Settings

To load an MKV file into GOTSent simply click File and use the file browser that pops up to find the MKV file you want to convert. You also must set an Output folder, you can do this by clicking Set Output and locating the folder with the browser that pops up. Next check to see if there is multiple audio with the drop-down box under Audio detected and select the language you want (with one audio track you will often just see und).

Make sure to select Split > 4GB as there is a size limit of 4GB for MKV files on Xbox 360. Fit to DVD is your choice. Before we begin conversion, we have to make sure that the audio that comes out is not multi-channel (unsupported by Xbox 360). Click AC3Filter Options.

AC3Filter Options

Based on the settings you put into AC3Filter, the conversion process will either create two-channel or multi-channel audio. Under Output format, change it to 2/0 - stereo to ensure compatibility of the output MP4 file with Xbox 360. When you are done, click Apply and click OK.

Conversion Process

Click the Convert button to begin the conversion process. Several DOS windows will pop-up during the process, do not close these as they are important. The amount of time the process will take depends entirely on the length of the MKV file and the speed of your computer.

Further Reading

When you get your MP4 file output, if you are not sure how to play the resulting file on the Xbox 360 console, then check out the link below.

Credits: AfterDawn.com: Guides: Convert MKV to MP4 for Xbox 360 (Easiest Method)

Vinyl Ripping: Equipment

|

Here's a quick lesson on how the technology works and what the major components are.

Records are recorded by cutting a small groove into a vinyl or acetate disk. The groove is modulated with the audio signal so that its depth and shape records the sound signal itself. During playback, the disk sits on the platter, which is the motor-driven spinning component and spins at a constant rate. Several rates were used, with the most common being 33-1/3 RPM (for 12" LP records) and 45 RPM (for 7" singles). While the disk spins, the stylus (or needle) which is housed in the cartridge rests in the groove. Holding the cartridge and stylus against the record is the tonearm that swings from a pivot as the stylus moves across the record, and has a counterweight to balance the force of the stylus on the record. As the stylus vibrates due to the groove's contours, coils in the cartridge convert the movement to an electrical signal. The electrical signal is of a very low strength, and must be amplified before it's sent to an amplifier or recording device. This task is handled by a dedicated phono preamp (or an integrated one in the speaker amplifier), which also performs another critical task - equalization. Due to the mechanical constraints of the record medium, both low and high frequencies are much quieter on the record than they should be at playback. A special equalization filter must be applied to restore the correct tonal balance; this task is performed by the phono preamp at the same time it is amplifying the signal to a usable level. This signal is then taken into a standard line input and amplified for playback, or recorded.

Equipment

I will discuss the turntable and cartridge/stylus separately here, as they are generally purchased separately. Chances are good that you'll need to purchase at least 3 components - a turntable, cartridge and phono preamp, so I'll spend the most time talking about these. If you need to buy all three, you should budget for at a bare minimum $200 expense (and a lot of time). If you need a quality sound card as well, budget another $100.

Turntable
Turntable quality is often assumed to be of little importance. All it does is spin the record, right? Unfortunately for us, that's not really true. What a record player does is convert physical vibration (of the needle in the groove) to an electrical signal that can drive an amplifier. The problems arise from the fact that the groove might not be the only thing vibrating the stylus - motors and mechanical instability can be huge noise culprits. Furthermore, frequency stability in the motor is extremely important to reduce wow and flutter. You can check this using the strobe built in to most higher-end turntables. Most turntables will have a dot or dash pattern around the outside of the platter. Many also include a built-in strobe, which flashes at a particular frequency. By looking at the dot pattern while the platter is moving with the strobe on, you should see the dots (usually one row for each speed) 'frozen' in place by the strobe. Any movement or wavering indicates an unstable speed.

If you're buying a new turntable, I would recommend looking on the used market for a belt driven model constructed mainly of wood or metal (plastic vibrates much more easily). Some direct drive models are good too, but others are horrible - if you're looking at one of these, be careful. Consistently good brands include Dual, AR, Thorens, Linn and others. Aim for models that were top of the line in their day. Also avoid any with a 'linear tracking' mechanism as these require additional tuning and have many problems. You can identify these types as they don't have a tonearm, the cartridge assembly moves on a tube across the record.

This is a place where you really need to research your options and put in the care to get a good turntable. Most of the stuff out there is going to be crap, and you need to sort through it and find the rare gems to get decent quality. Especially with belt-drive and idler-based turntables you may need to replace belts or idler wheels to get stable rotation speeds. Check this before purchase, or expect to invest in the maintenance if buying online. If you can't find anyone praising it on forums and so on, don't buy it.

Because of the difficulty with finding and getting a good vintage turntable tuned up, you may want to consider the new (or less-used) market. Price goes up to $300-400 for a new quality turntable. Look at options like the Pro-Ject Debut III and Rega P1 and P2. These will often include a quality cartridge.

Spend $75-100 on the used market, though the sky's the limit.

Stylus & Cartridge
Choosing a cartridge is largely a matter of personal preference, but there are some important considerations. First, you should replace any cartridge that you don't know the history of, they are easily damaged and do wear out with use and over time, so if you buy a used turntable you should buy a new cartridge as well.

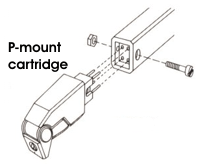
Several types of cartridge are available. Most cartridges are of the moving magnet type, and these are also the least expensive. If you're reading this guide, this is the type you should buy. Beware that there are two common mounting methods used for cartridges. The P mount has a rear section that fits inside the tonearm, while the standard (1/2 inch) mount screws onto the underside of the tonearm. Make sure you get the right type, or a universal type.


Good brands include Grado, Ortofon, Audio Technica and others. Choosing a specific model can be particular about the exact properties of your turntable and tonearm, so I would advise asking at a Hi-Fi audio shop or audio forum for advice. The most commonly recommended cartridge I've seen is the Grado Black, which is relatively inexpensive and readily available. Audio Technica AT95 is also often recommended and is somewhat less expensive.

Spend $50-75. Don't buy used.

Phono Preamp
You may have one already, if you've got a receiver/amplifier with a phono input. The quality may not be the best, but it would certainly be usable. If you've got such a unit, connect the turntable to it and switch the input to 'phono'. It should have a 'tape monitor' or 'preamplifier' output that you can use to record from. I do not recommend this option if you can avoid it though, most receivers have cheap, poor sounding and noisy phono preamps.

If you're buying, there are lots of options. The used market is a good place to look, try to find reviews by audio magazines or on audio forums for ones you're considering. Excellent new phono preamps can be had for quite a small amount of money, so that is the route I recommend. The TCC TC-760LC is widely regarded as a good deal - it's only about $75 and reportedly sounds good. Another good option is the Cambridge Audio Azur 540P, also well regarded and available for under $100. For a few more dollars the Hagtech Bugle seems to be universally loved, at $150 (with no case or power supply). If you've got some electronics savvy and would consider a DIY solution, the RJM Audio VSPS is a good choice and can be built for next to nothing, the Phonoclone at the same site is also excellent, as is the DIY version of the Bugle.

Expect to spend $75-100 on the new market, or $25-75 on the used market.

Sound Card/Capture Device
You'll need a good quality sound card capable of 96KHz/24bit or 192KHz/24bit capture. Aim for a device with good analog specifications. Unfortunately onboard audio devices don't meet this requirement, you'll definitely need a separate sound card to get a decent quality capture. If you've already got a Creative X-Fi model card, it will suffice, but I can't recommend these for anyone purchasing a new one. If you've got a PC with a PCI slot available, I recommend the e-mu 0404PCI or e-mu 1212m (about the same price, the 1212m is much better if you can get it), or the M-Audio Audiophile 192. If you can't find these, the M-Audio Audiophile 2496 is an excellent card as well, though it doesn't support 192KHz operation and doesn't have as impressive specifications. Finally, if you need multichannel or a more entertainment oriented card, the Asus Xonar DX2 is probably a good choice.

If you'd like an external unit, I can recommend the e-mu 0404USB or e-mu 0202USB. For Firewire, the M-Audio Firewire Solo is fairly well regarded. Going with external will cost you extra and probably sacrifice some quality too (at this price range), so I'd go with internal if you can.

Spend $100-150 new for an internal, $200-250 for an external.

Cables
You'll also need interconnects, to hook all of this up. You'll need at least one stereo RCA cable to connect the turntable to your preamp (though many turntables have this attached), as well as the correct cable to connect the RCA jacks on your preamp to your sound card. There are three common jacks used on sound cards, and you'll need to get the correct type for your card. Consult the following descriptions to determine what type of cable you need.

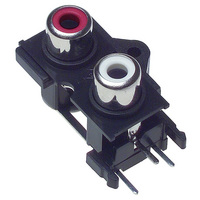
RCA jacks appear in pairs colour coded red and white (or black), they're the same type used for most audio equipment. The red jack carries the right channel audio signal, the white jack carries the left channel. If your sound card has this type (Audiophile 2496), you need a standard RCA cable. They look like this:


3.5mm (1/8") 'Mini' jacks are common on consumer gear, and are the type most people are familiar with. They carry both stereo audio signals on the same connector. The same type is used on iPods and other portable devices, and most headphones today use this type of plug. I don't have a good photo of an example, but most people should be familiar with these. The necessary cable is readily available.

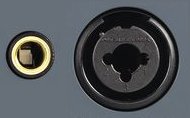
1/4" TRS jacks are common on professional gear, and generally carry only a single channel per cable. There are 3 conductors in this jack, tip-ring-shield (TRS), designed for balanced signals. In our application we're going to be using single-ended signals, so a connector with two conductors (TS) is more appropriate. If you have this type of input (All e-mu cards, M-Audio Firewire Solo), you will need a pair of RCA to TS cables (or a stereo set). These are somewhat more difficult to acquire, but should be readily available at professional audio equipment dealers (probably where you bought your sound card anyway). The TRS jack can take on a couple forms, as it is often used in a 'combo' connector that can accept either an XLR jack (microphone) or TRS jack. It looks like one of the two jacks in the photo:


Don't waste your money on overpriced cables. You shouldn't spend more than $10 on a 6ft cable, so don't let anyone sell you more expensive ones (such as Monster Cable), they are NOT worth the money.

I recommend you buy your RCA cables from Monoprice. The quality is good, the service good, and the prices (and shipping) excellent. Their RCA->mini cables are of dubious quality though, and they don't sell RCA->TS cables either. I'll link to what I recommend for each, though they're very non critical and similar examples can be found at most retailers. Don't try to use the XLR inputs on your professional soundcard, as these are designed for microphone use and won't work properly with your phono preamp.

-2xRCA to 2xRCA, 3ft or 6ft
- Technologies Inc. 3.5mm to 2xRCA, 5ft or at monoprice
-2xRCA to 2x1/4" TS, 5ft

PC
Most any PC should work fine for this. You'll need lots of disk space (you should have a minimum of 10GB free before attempting a capture), but the performance requirements are not particularly high. USB will use the most processing power, and has the most risk of audio dropouts.

For vinyl ripping, see:
- Vinyl Ripping
- Vinyl Ripping: 24bit 96khz

Vinyl Ripping: 24bit 96khz

|

Equipment:
This is an overview of the equipment you will need, for a guide on the equipment, see Vinyl Ripping: Equipment
- Turntable
- Stylus and Cartridge
- Phono Preamp
- Sound Card/Capture Device
- Cables
- PC

Tuning
Properly tuning a turntable is a difficult and fairly important bit of maintenance you really should do for the device that probably hasn't seen use in 20 years and likely has a brand new cartridge. I would really recommend taking your turntable to a qualified professional and paying for a proper tuneup, but as always it is possible to do yourself. Improperly adjusting your turntable can damage your records and accelerate wear, as well as affecting audio quality, so please recognize the risks. It's also very helpful to have some fairly expensive tools at your disposal. I won't go into detail on this process here, but you can find a reasonable guide at this site.

It's also important that the turntable is on the most level and stable surface as possible. Any vibrations that transfer to the tonearm or platter will show up in the recording, so try to place the turntable in the most stable place you can.

Setup
Your signal chain should be fairly obvious. You will need to connect components such that the signal goes from Turntable -> Phono Preamp -> PC. In most cases this will be simple to achieve, but I will give a few pointers. If you're using a receiver or integrated amplifier as your phono preamp, it probably has a 'tape monitor' or 'preamp' output. You should use this output to connect to your PC, but you may need to enable the tape monitor feature on the amplifier as well. On professional sound cards, the inputs are often not labeled specifically for left or right; generally you would connect the left (white/black) channel to the first input and right to the second. On consumer level cards there is often a mic input as well as a line input. Use the line input only, the mic input is not appropriate for this use.

Recording
I recommend using Audacity as your capture software. It's simple and fairly foolproof, and free open source software. If you'd prefer, there are many suitable applications such as Adobe Audition. This guide was written against Audacity 1.2.6.

Configuration
First we will configure Audacity for 24/96KHz capture with the correct audio device.

-Edit/Preferences

-Audio I/O tab
On this tab, make sure the correct capture device is selected under 'Recording', the brand and model should be listed here. You might also want to change the Playback device so you can monitor the recording, the default 'Microsoft Sound Mapper - Output' device will play back to your normal windows sound device. Choose 'Software Playthrough' if you'd like to monitor the output while recording.

-Quality tab
On this tab, follow the settings in the screenshot below. If your sound card is capable of it, you may select 'Other' for the Default Sample Rate, and type 192000 in the box for 192KHz capture.

-File Formats tab
On this tab, you must select 'Other' for the 'Uncompressed Export Format' option; this will give you a box to choose the encoding. Select WAV and 'Singed 24bit PCM' for the encoding. The other options don't matter for this guide.


-Directories tab
If you need Audacity to use a different hard drive during capture, you can change it here.

Restart Audacity after making these changes.

You will also need to configure your sound card itself for the desired sample rate. Usually this is accomplished through a driver control panel for your sound card. It should match the setting you set in Audacity. If you have an option for 'Internal' or 'External' clock (Master/Slave is a term also used, you want Master), you want to choose Internal here.

Record Preparation

It is a good idea to purchase a quality record cleaner and clean your records just before capturing them, and to use the dust cover on your turntable. Even the smallest speck of dust will be audible in a recording; the less dust the better. I don't have any specific recommendations here, but I highly recommend you do some research and purchase a good cleaner.

Also, if at all possible, use records that haven't been played much and that have no visible scratches. Wear is a problem as the vinyl is only good for a certain number of plays before it starts to wear down affecting the quality. Obvious scratches will cause lots of loud pops that are difficult to remove nicely and obviously ruin quality. If you don't have a record in good condition, it's not worth the trouble of recording it.

Capture Preparation
We will first be making a test recording to set levels and make sure everything is working properly, so get everything set up, turned on, and put your record on the turntable. Get it fired up and playing.

To start recording, press the record button in Audacity (red circle), and you should see the waveform being recorded as well as the VU meters at the top jumping around. Now we need to set the levels to ensure there isn't any clipping. The screenshot below shows what the VU meter looks like during recording, with a properly adjusted level (though a bit low).

You should aim for peaks reaching about 75% of the maximum level (the peaks are represented on the VU meter with an extra line showing the highest the signal's been in recent time). Try to play the loudest part of the record while you adjust to make sure it's not going to start clipping halfway through and force you to rerecord.

How you actually adjust the levels depends on the sound card you have. Most external cards will have a knob attached to each input that adjusts the level (as well as an LED-based VU meter) - the best setting for these is at their maximum, minimum or at any spot where there's a detent, as long as this puts the signal at a proper level. It's difficult to match them otherwise between the left and right channels, and the balance of the recording might be off if you adjust them.

If you've got an internal card, the driver control panel should provide a level adjustment slider for the inputs. Make you're not just adjusting the output or one of the S/PDIF channels as they can sometimes be confusing. You want to make sure the 'stereo link' is enabled to adjust the channels at the same time. Most drivers will show a VU meter on this panel as well which you can use in addition to the Audacity VU meter.

The level itself is not critical, but it should be at least 50% of the maximum and should never approach 100% at any time.

Once you've got the levels set, stop the Audacity recording and listen to the few minutes of audio you should've recorded. Make sure it sounds good (don't worry if it sounds a bit quiet) and listen for any audio dropouts (there shouldn't be any).

Capture
Finally! Everything is set up and it's time to capture a side. This part is easy.

Create a new project in Audacity and discard your old test one. Stop your turntable.

Now we're ready to start, so press record (red circle) in Audacity and then start the turntable and place the needle in the lead-in area. You shouldn't listen while recording, as the vibrations from speakers can be a contributor to distortion, though if you'd like to monitor on headphones I recommend this.

Once the side is complete, stop Audacity and the turntable. We'll do a side at a time in the guide, once you're done one side, go back and repeat from the Capture step.

Track Splitting

The first thing we're going to do after capturing the audio is to split it into tracks and proof it for quality. Just start playing the audio from the very beginning. When you reach the start of the first track, stop playback and move the playhead (just click in the waveform window) to just before this point. You'll have to use your judgement where to place the track break. Press Ctrl-B (or Project->Add Label At Selection) to create a new label. Your cursor will be in the 'title' for the label at this point, so just start typing the name of the song. Once you've got the label made, press play again and make sure you've got the label in the correct spot and also listen to the track for any problems. Continue for all the other tracks on the side.

Once you've got labels created and properly positioned for all the tracks, we will amplify the signal to a normal level. Select the entire waveform (Ctrl-A or Edit->Select->All) and then choose Effect->Amplify. This will automatically set itself for 0dB maximum output, which is close to what we want. If you see the Amplification (dB) box shows 0.0, you have clipped the input during recording and you'll need to do it over with a lower level. Otherwise, type -0.1 into the 'New Peak Amplitude' box and press OK. It may take a moment, and you should see the waveform become larger.

Now we'll export to WAV files for encoding. Choose File->Export Multiple... and the following dialog appears. Note that unless you check the box and type a name in the box, audio before the first label will be lost - so make sure you labeled the first track.


Post Processing

Okay, the title says 'Complete', but this is one thing I'm not going to go into here. It involves removing clicks and pops, and possibly noise. The problem is that if you've followed the steps up until now, you should have a good quality recording with little noise and rumble that would be easily removed by an automated script. You will need to go through the recording by hand and remove each individual random click or pop. This can be done in Audacity by selecting the problem area and choosing Effect->Click Removal... You can find more detail on this technique at the Audacity wiki.

I do not recommend using the noise removal plugin as many other guides recommend. If you've followed the equipment guidelines and have a reasonable quality setup, the constant noise should be very low. This plugin is not appropriate for removing small vinyl noise which is almost impossible to get rid of. If you've cleaned the record well and the recording is still noisy and fully of pops, chances are that the record itself is just in poor condition and not worth capturing. Please just remove problem clicks and pops as necessary, and try to apply as little processing as possible to your recording.

Disable auto-backup of iPhone in iTunes (Windows)

|


I got tired of waiting for my iPhone to auto-backup when I quickly wanted to sync a few songs or videos before going to bed. A quick Google search brought up a bunch of results for Mac, but not much for Windows. After some searching, I found the solution to disable the auto-backup. I wrote a little program that will enable or disable the auto-backup feature in iTunes when you plug in your iPhone.

It requires .NET 3.5 SP1. If you aren’t sure if you have it, the program will let you know when you try to open it.

Download QuickDisable

This program was designed and tested on Vista, though it will work fine on XP. You may have to define the locate of iTunesPrefs.xml if the program can’t find it.

If you want to disable the auto-backup feature in iTunes manually, follow these steps:

  1. Locate iTunesPrefs.xml by going to Start->Run and typing %appdata%\Apple Computer\iTunes and hit OK.
  2. Backup iTunesPrefs.xml
  3. Open iTunesPrefs.xml and search for User Preferences
  4. Under the next add the following:
    • DeviceBackupsDisabled

      dHJ1ZQ==
  5. Save your changes and restart iTunes. Auto-backup is now disabled.

NOTE: Be sure that you enable auto-backup every so often to get a fresh backup. It would be a sad thing to be in a position where you have to restore your iPhone but your using a backup that is a few months old.

QuickDisable does not have any type of warranty or guarantee, you are using QuickDisable at your own risk. I hold absolutely no responsibility for any damages it may cause.

IP Blocking for uTorrent in Windows XP & Vista

|

For years now, Anti-P2P organizations have been polluting BitTorrent with fake peers and bogus torrent files, which send out fake or corrupt data in order to slow down file transfers and/or log the IP addresses of users who ’share’ the torrent. This is typically rampant on a communal BitTorrent level through publicly-accessible torrents from popular sites such as ThePirateBay, mininova, Isohunt, et al. Consequences range from those laughable (but sometimes scary) DMCA notices sent from your ISP; cease-and-desist letters; and even worse, pre-litigation letters from any company under the RIAA / MPAA / IFPI “umbrella”.

To significantly reduce your chances of connecting with malicious peers, the integration of IP Blocking is crucial to P2P safety. This can be approached through third-party software, including PeerGuardian2 or Blocklist Manager - but it can also be handled client-side through IP blocklists. µTorrent supports IP blocking at the BitTorrent protocol level - and it’s a great solution for Vista users who don’t yet have the option of using an external program such as PeerGuardian2.

This article has been done to death, but I’ve updated it with easy-to-follow screenshots and a working link to the updated file.

Installation

1. Download the nipfilter.dat.gz file, and save. NOTE: You’ll need to open and extract it with WinRAR or 7-ZIP (or any other archive program). Extract ipfilter.dat and save to the location of your choice. Similar lists can also be found at http://iblocklist.com/lists.php.

2. Copy the file to your “C:\Documents and Settings\<your computer name>\Application Data\uTorrent” directory. To locate this, open a folder and in the Address Bar, type in: %AppData%\uTorrent.

This can also be done through the “Run” command. Click the Start Button, and select “Run” - enter %AppData%\uTorrent. If using Vista, click the Start button, and in the Search Field type in ‘Command prompt’.

3. After the file has been copied there, either restart µtorrent or hit CTRL+P in the µtorrent window, and select OK. To verify that the IP blocklist is working, click on the LOGGER tab and look for “Loaded IP Filter.dat”, like this

IP Blocking for µtorrent & Vista

This is a great solution for Windows Vista users who want to incorporate PeerGuardian-style IP blocking and use BitTorrent exclusively. The procedure is exactly the same as above, except in Step 3, you’ll need to place the ipfilter.dat file in this directory:

C:\Users\\AppData\Roaming\utorrent.

Another alternative is to use a pre-release ‘beta’ version of PeerGuardian2 for Vista.

Troubleshooting - IP Filter & µtorrent:

By default, IP filter is already turned ‘ON’ in the latest versions of µtorrent. If you’re using an older version, verify that it is set to ‘ON’ in the settings. Go to OPTIONS > PREFERENCES… and scroll down to where it says “ip filter:enable“. Choose “True” and click ‘OK’ to save.

How To Speed Up Torrents with Low Seeders

|

Here’s a ridiculously easy tip to squeeze out as many users as you can on a dead or dying torrent. It’s particularly handy when a torrent stops near the end, and/or the seed count is listed as zero. Having said that, I’ve also noticed that it helps to increase download speeds from healthy torrents, as well.

NOTE: Do not attempt this trick with private torrents - it’ll only get you banned from the tracker. Use this tip with torrents you find at mininova, thepiratebay, etc.

How it works:

Simple. Just copy/paste this list of public trackers into your torrent’s tracker list.

http://tracker2.istole.it:60500/announce

http://inferno.demonoid.com:3407/announce

http://vip.tracker.thepiratebay.org/announce

http://track.sextorrent.to:2710/announce

http://tracker.deluxebits.to:3552/announce

http://denis.stalker.h3q.com:6969/announce

http://tracker.thepiratebay.org/announce

http://tracker.torrentbox.com:2710/announce

http://tracker.hexagon.cc:2710/announce

http://tracker.torrent.to:2710/announce

http://axxo.sladinki007.net:6500/announce

http://220.162.244.175:53880/announce

http://tpb.tracker.prq.to/announce

http://open.tracker.thepiratebay.org/announce

http://eztv.sladinki007.net:60500/announce

http://tv.tracker.prq.to/announce

http://218.145.160.136:8080/announce

http://tracker.prq.to/announce

http://tracker.torrenty.org:6969/announce

http://tpb.tracker.thepiratebay.org/announce

http://t.ppnow.net:2710/announce

http://www.torrentvideos.com:6969/announce

http://tracker.bitebbs.com:6969/announce

http://www.torrent-downloads.to:2710/announce

http://eztv.sladinki007.eu:60500/announce

http://www.ipmart-forum.com:2710/announce

http://tracker.ydy.com:83/announce

http://bt1.the9.com:6969/announce

http://tracker.sladinki007.net:6500/announce

http://tracker.ydy.com:102/announce

http://tracker.paradise-tracker.com:12000/announce

http://moviesb4time.biz/announce.php

http://tracker.deadfrog.us:42426/announce

http://mpggalaxy.mine.nu:6969/announce

http://www.sumotracker.org/announce

Applying the trackers to uTorrent:

In particular, this is a ‘µTorrent-compatible’ list, so that’s where I’ll show the example.

Open µTorrent, and right-click on the suspiciously-slow torrent. Select "Properties…".


In the first window box, the "General" tab should be open, and there should already be a list of existing trackers (or perhaps just one). ‘Copy’ the list from above, and ‘paste’ them into the window.

You should now be left with what looks like this (see below). Be sure to click "OK" to save the changes.


While you’re at it, make sure that “Enable DHT” and “Peer Exchange” have checks in them, too. Now, if there are ANY public users on that torrent, you’ll be sure to find them.

Want to really increase the speeds of your torrents? Try a seedbox - the guaranteed method to speed up torrents:


The All-new Torrents Open Registrations Checker

|

Looking for a great “live” solution to accurately assist in finding private trackers that are open for signups? After months of heavy development, Team Roots has finally launched a new, speedier (and vastly improved) version of TORC - the Torrents Open Registrations Checker v1.25. TORC has it all - a great list of current trackers; filtering options; tracker icons; detailed view; and, of course - automatic timed & repeat checking of selected private trackers to see if they’re open for direct signups.


New Features:

  • • Complete Redevelopment.
  • • Huge Performance Enhancements.
  • • Fast Parallel Searching.
  • • Tracker description on MouseHover.
  • • Custom Icons.
  • • Advanced Conditions for accurate results.
  • • Filters.
  • • Grouped View (Detailed View)
  • • Find (search tracker) function.
  • • Automatic Tracker Importer (Adder).
  • • Advertising options.
  • • Automatic Updates.

How TORC Works:

TORC requires Windows XP, 2003, Vista or above; and the Microsoft.NET Framework 2.0 or higher (found here). Download TORC from here:

http://teamroots.co.cc/projects/torrents-open-registrations-checker.html

Simple Usage: Run TORC, and put checkmarks in the trackers you want it to check, and click the magnifying glass icon in the left of the top menu. Here’s the index of the results of the search:

— Denotes trackers that are currently open for signups.

— The registration page exists, but signups are not open.

— Search timed out (no results reported).

— Signup page is down, or the tracker is offline.

For sites that display a green checkmark, simply double-click on the tracker name in TORC - this will launch you to the desired tracker’s signup page.

Automatic Interval Checking

By default, TORC is not set to "timer mode" whereby it will repeat and/or countdown to a predetermined time to recheck the selected trackers in the list. To enable this:

1.) Go into Options > Settings and change the radio button to "Repeat Timer". The default is 10 minutes, which can also be changed.

2.) Next, you’ll need to turn on the timer to complete the action - this can be done by

clicking the clock icon at the far right corner. This will start the countdown (i.e. - from 10 minutes) and it will repeat the check of the selected trackers once it hits 00:00:00.


Minimizing TORC:

TORC can also be minimized into the taskbar and automatically notify you when it’s found your selected trackers open - which is handy for certain trackers that are seldomly open, or the open signup time is short (such as Demonoid). Once TORC has found your trackers, it pops up with a message (and an sound alert) notifying which trackers it has found. (Note: careful with this; when you click the Launch button, TORC will open all of the trackers in the list that have checkmarks).

Customizing TORC

Filtering: Trackers can also be arranged by category, as TORC makes it easy to find & select key trackers from a group. Simply click the Funnel icon and make changes as shown below:

View as Detailed List or Icons: TORC’s trackers can be viewed in icon list mode (default) or changed to Detailed List which will show categories, signup URLs, and additional info. Access this in Options > View Mode >

Tracker Settings & ‘Timeouts‘: In Options > Settings > Tracker Settings (tab), you can change the timeout value (the default is 5 seconds) to a higher number if you’re getting too many ‘timeouts’. Note that this is for each selected tracker - too high a value will undoubtedly increase the search time. Additionally, on the Search Settings tab you can adjust the Maximum Connections setting - a lower value may also help to prevent timeouts. Lastly, if timeouts occur much too often, either limit how many trackers you’ve selected in TORC, and free up your Internet connection.

Other TORC Features:

Add/edit New Trackers: While TORC currently comes loaded with 182 private trackers, it also supports personal customized functionality - you can also add, edit & delete entries. To add a tracker that is NOT open to signups but you want to add it into TORC, you’ll need:

1.) The tracker signup page URL (i.e. http://www.knights.it/signup.php).

2.) Assuming that the tracker is NOT currently open to signups (but the page exists), you’ll need some text from the signup page that will probably disappear once replaced when open. For our example:

3.) Go into TORC, and select "Add New Entry". Enter in a name for the tracker, and the signup URL. Change the radio button over to "text not found", and enter in some text - i.e. ‘has been reached’ is a good example, and is expected to be replaced once signups open. Add in any additional info you want (you can always come back and edit the entry). Click OK to finish - the new entry should now be added.

{[404]} TIP: Many private trackers are getting wise to websites & software that can identify when they open for registration, so they remove the signup page completely (but temporarily) when not open for signups. However, you can still add trackers that have taken their signup page down, and have TORC notify you when the page comes back online. Follow the steps above, and for "text not found" enter in this: {[404]} (with both sets of brackets). If or when the signup page comes back online, the 404 won’t be found and TORC will notify you. An example of this is when RevolutionTT does their "goodwillweekend.php" signup page. NOTE: You’ll obviously need to know the exact URL/name of the signup page, even if it is currently down.

TIP: By default, the new entry is added to the end of the list. Use the "List > Sort List > Ascending Order" feature to list the new tracker alphabetically.

Check For New Trackers: TORC supports an online feature where new trackers can be added into the program. To check, go to Help > Check for new trackers…

Correctly Format An Audiobook For Your iPod

|

Today I will be going over how to format your audiobooks in such a way that they appear in the "Audiobooks" section of your iTunes and your iPod. Adherence to this method will result in, not only better organization, but also a better listening experience. What I will show you includes how to convert files into a special audio format which is able to leave a virtual ‘bookmark’ in the file every time you decide to change the music or shut your iPod/iTunes down. This guide is for Windows XP users.

STEP 1:

— Rip / import audiobook into your iTunes

Okay… the first step, obviously, is getting your audiobook tracks into iTunes. You can do this by inserting an audiobook CD and clicking the import button, or (if the files are already on your hard drive) by click FILE > Add Folder to Library… From here, simply select the folder containing your audiobook files.

Step 2:

— Converting files to AAC

This is a two part step:

First go into iTunes preferences (Edit > Preferences). Select the Advanced tab, and then the ‘Importing’ sub-tab. Make sure that you have ‘AAC Encoder’ selected in the second drop down menu (see figure 1).

Apple requires you to convert your files to their own proprietary format before they are able to be recognized as an audiobook. To do this, simply highlight all the files that make up your audiobook and select ‘Convert Selection to AAC’ rom the ‘Advanced’ menu at the top of the screen, or right click each individual file and select ‘Convert Selection to AAC’.

Once the files are encoded as AAC, you have one step left…

Step 3:

— Changing file types from .m4a to .m4b

For this step we must set each file to show its 3 letter filetype extension after its name. To do this, open the folder containing your newly encoded AAC files (right-click and select ‘Show in Windows Explorer’). Within the folder, select Tools > Folder Options. Next, select the ‘View’ tab and make sure that the ‘Hide extensions for known file types’ is UNchecked.

You will now see the 3 letter extensions after each file name (see below).

Notice how your encoded audiobook files are all now .m4a files. The final process is the manually rename each of these files to .m4b …simply replace the ‘a’ with a ‘b’.

Once that is done, you have a fully functioning audiobook. If this process does not work right away, try removing the files from you iTunes library and adding them back in. The files should then appear under the AUDIOBOOKS section.

— A much easier way to do this is to download the program MarkAble which not only automates this conversion process, but is also able to merge the audio files into one.

Scratched CDs: An Easy & Cheap Way To Repair Them

|

In this tutorial I will show you how to repair scratched CDs that are giving you errors such as Mismatching CRCs, Read Errors, Sync Errors and Suspicious Positions. If you do it properly, your scratched CDs should then give you perfect rips with matching CRCs. Even badly scratched CDs can be repaired, as long as the reflective layer (label side) is not damaged.

Before you do it on an original CD, I suggest you practice on an old (badly) scratched CD-R first.
Whatever you do, do NOT buy the cd repair kits. They’re too expensive and pretty bad at doing what they’re supposed to do. When you’re done repairing, you’ll see light scratches on the CD. Don’t worry, they are way too small to affect playback or ripping in any way. If you want to get rid of them for aesthetic reasons, you can use finer grain sandpaper.

Specs
—————–
For this tutorial I used a cd my girlfriend brought from work and wanted me ro repair: This Is Tom Jones by Tom Jones. It’s actually a boxset where the 3 cds were extremely scratched; they would skip like crazy when played in the cd player and were impossible to rip. After repairing them, all 3 cds (74 songs) are ripping perfectly with all CRCs matching.
I’ve used EAC V0.99 prebeta 4 on a TOSHIBA ODD-DVD SD-R6372 drive. Rip in Secure mode, proper Read Offset Correction, Test & Copy. High error recovery quality.

What you need
—————–
- 1 scratched CD
- 3 to 10 minutes
- A bottle of Meguiar’s PlastX (clear plastic cleaner & polish).
- Emery paper: 1500 or 2000 Grit. I use the 3M Wetordry Automotive Sandpaper.
- A piece of cloth. I use an old scarf. You can use an old t-shirt, sock, towel..
- A piece of paper towel.
- Warm water

You can find the emery paper and the PlastX bottle at your local auto supply store. I bought my stuff at Canadian Tire and paid 10.49$ for the 296ml PlastX bottle and 2.99$ for five 3.66 inches by 9 inches sheets of emery paper. With that, you’ll have enough to fix over a hundred CDs.

Repairing
—————–
First, cut a small piece of emery paper, 1 inch by 1 inch will do, and you will be able to do a few CDs with that.

Soak it in warm water, and put a little bit of water on the cd with your finger.

Start sanding the cd in the motion shown below. This is for a badly scratched cd, you don’t have to do the whole cd if there are only a few scratches. Just do it where the scratches are.

Put a little bit of pressure when you’re sanding. When you think you’re done and scratches are gone, keep sanding but don’t put any pressure to get rid of the (small) scratches you may have done. I use the 1500 grit for sanding with pressure, and the 2000 grit without pressure to finish off.

Rinse the CD with warm water and dry it out with a paper towel.

Now, put a few drops of PlastX on the cd and polish it with a small piece of cloth until the PlastX gets absorbed by the cloth. To polish the whole surface, I put about 6 drops wich is more than enough.

Rinse the CD with warm water and dry it out with a paper towel.

Now the shiny surface of your CD should be shiny again. Look really close to see if there are any scratches left. If there are, you didn’t sand enough; repeat sanding and polishing.

Your CD should now rip properly.

Example
—————–
The picture below shows a scratched CD before and after being repaired. I used rough sandpaper to scratch it, and then repaired it. The pictures show the SAME CD and the EXACT SAME AREA on the CD. I didn’t switch CDs, photoshop it, or anything.

How To make Utorrent 1.8.2 faster

|


tittle says all any

Link: click here

Trace private calls

|

Easy way to trace private calls

http://www.reversescan.com/

http://www.whitepages.com/reverse_phone

http://411ca.whitepages.com/reverse_searches/

Rip a DVD to make exactly 700mb

|


Learn to back up your DVDs or captures easily and with good quality, to be played in your DVD/MPEG4 player, or on your computer, or perhaps from your computer to your TV set through a TV out on your graphics card.

Link: http://www.autogk.me.uk/modules.php?name=TutorialEN